High Protein No Bake Granola Bars
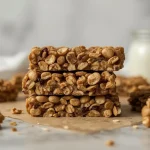
These no-bake granola bars are packed with protein from peanut butter, oats, and whey protein, offering a chewy, satisfying texture with a hint of honey sweetness. Perfect for a post-workout snack or a quick breakfast on the go, they hold together beautifully without any baking.
- Prep Time: 15
- Total Time: 75
- Yield: 4 1x
- Category: Snack
- Method: No-Cook
- Cuisine: American
Ingredients
- 1 cup (80g) rolled oats (use certified gluten-free if needed)
- 1/2 cup (120g) creamy peanut butter (natural, no-sugar-added preferred)
- 1/4 cup (60ml) honey
- 1/4 cup (30g) vanilla or unflavored whey protein powder
- 1/4 cup (30g) chopped almonds
- 1/4 cup (40g) mini chocolate chips (optional, or use sugar-free)
- 1/2 teaspoon vanilla extract
- 1/8 teaspoon fine sea salt
Instructions
- Line an 8×4-inch loaf pan with parchment paper, leaving overhang on two sides for easy removal. Alternatively, use a 9×5-inch pan for slightly thinner bars.
- In a medium microwave-safe bowl, combine the creamy peanut butter and honey. Microwave on high for 20 to 30 seconds, until warm and runny, then stir until smooth. Do not overheat, as the mixture can burn.
- Add the vanilla extract and fine sea salt to the peanut butter-honey mixture. Stir well to incorporate. The salt balances sweetness and enhances flavor.
- In a large mixing bowl, whisk together the rolled oats and whey protein powder until evenly distributed. This prevents protein clumps in the final bars.
- Pour the warm peanut butter mixture over the dry ingredients. Add the chopped almonds and mini chocolate chips if using. Stir with a silicone spatula until all dry ingredients are thoroughly coated and a thick, cohesive dough forms. If the mixture seems dry, add 1 to 2 teaspoons of water or milk; if too wet, add a tablespoon more oats.
- Transfer the mixture to the prepared pan. Using the spatula or a piece of parchment paper, press it down firmly and evenly to compact the bars. This step is crucial to prevent crumbling later.
- Place the pan in the refrigerator and chill for at least 1 hour, until the bars are firm and set. For best results, chill for 2 hours.
- Once set, lift the block out of the pan using the parchment overhang. Place on a cutting board and cut into 4 equal bars (or 8 smaller squares for a snack). Use a sharp chef’s knife for clean cuts.
- Wrap each bar individually in plastic wrap or store in an airtight container. Keep refrigerated for up to 1 week, or freeze for up to 2 months. Let frozen bars sit at room temperature for 5 minutes before eating.
Notes
Storage: Refrigerate bars in an airtight container for up to 1 week. Freezing: Wrap each bar tightly in plastic wrap and place in a freezer bag for up to 2 months. Thaw at room temperature for 5 to 10 minutes before serving. For a vegan version, use maple syrup instead of honey and plant-based protein powder. For nut-free, substitute sunflower seed butter for peanut butter and omit almonds. If the mixture crumbles, it likely needs more moisture or pressing; add 1 teaspoon of water or a dash more honey if dry.
Nutrition
- Calories: 386
- Sugar: 22g
- Sodium: 214mg
- Unsaturated Fat: 4g
- Carbohydrates: 42g
- Fiber: 5g
- Protein: 18g
- Cholesterol: 15mg
Keywords: protein granola bars, no bake granola bars, high protein snack, peanut butter granola bars, whey protein bars, healthy snack, meal prep bars, chewy granola bars, energy bars, gluten free with oat verification