
Protein Cheesecake With Greek Yogurt Cream Cheese is the dessert I turn to when I want something that tastes indulgent but actually supports my daily protein goals. This American-style baked cheesecake blends cream cheese, thick Greek yogurt, and cottage cheese into a filling that’s rich, smooth, and lightly sweetened with honey and vanilla.
The whole process takes about 20 minutes of prep and 55 minutes of baking, plus cooling time — I’d call it intermediate because of the water bath step. Each of the 4 servings delivers 27g of protein, which makes it a fantastic weekend baking project or a make-ahead treat for a healthy dinner party.
What is Protein Cheesecake With Greek Yogurt Cream Cheese?
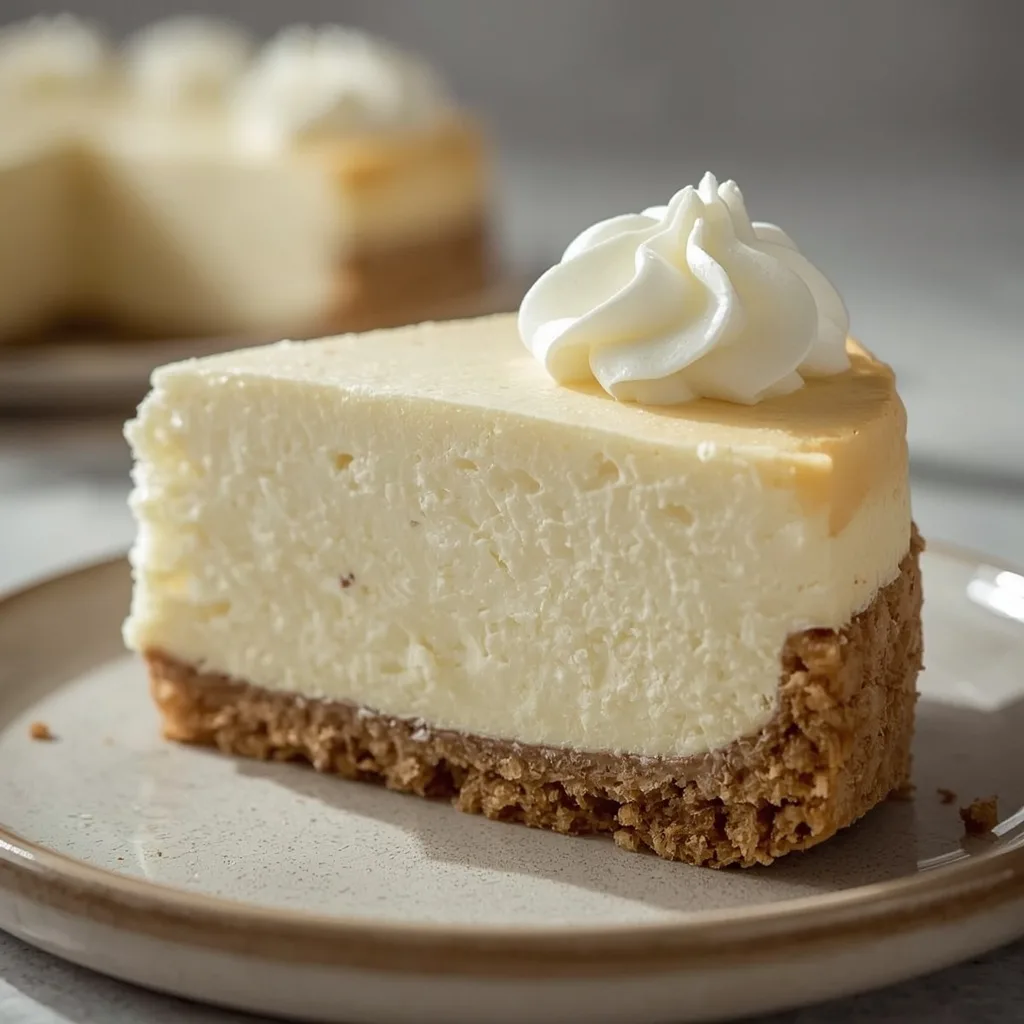
This is a crustless-style cheesecake built on a thin almond-oat base that adds texture without loading up on refined carbs. What makes it different from a standard New York cheesecake is the triple-threat protein base: cream cheese for richness, Greek yogurt for tang, and cottage cheese for volume and creaminess.
The filling gets pureed until completely silky, then baked low and slow in a water bath. That gentle heat is what gives you that classic velvety texture without cracks. The honey keeps things naturally sweet, and the cinnamon-kissed crust adds just enough crunch to contrast the smooth top.
Why You’ll Love This Recipe
Here’s what sold me the first time I tested this cheesecake in my own kitchen.
- Serious protein per slice — Each serving packs 27g of protein, which is honestly unheard of for a dessert that tastes this close to the real thing.
- Tastes like classic cheesecake — The honey-vanilla flavor and smooth texture make it hard to believe there’s cottage cheese hiding in the filling.
- Naturally sweetened — Honey does the work here, so you skip refined sugar without sacrificing that dessert feeling.
- Great for meal prep — You can bake it on Sunday and have portion-controlled servings ready for the week ahead.
- Low-carb crust — The almond flour and oat base keeps carbs modest while adding a subtle nutty crunch.
- No protein powder required — The protein comes entirely from real dairy ingredients, which means better texture and no chalky aftertaste.
Ingredients Needed to Make Protein Cheesecake With Greek Yogurt Cream Cheese
You’ll notice this list is shorter than a traditional cheesecake recipe — and most of it is dairy. Let’s break it down.
For the Crust
- 1/2 cup almond flour (56g) — This forms the base of your crust and adds healthy fats plus a mild nutty flavor that pairs beautifully with honey.
- 2 tbsp rolled oats (12g), finely ground — Grind these in a food processor or coffee grinder so they blend seamlessly with the almond flour.
- 1/4 tsp ground cinnamon — A warm spice that elevates the crust and ties into the honey flavor.
- 1 tbsp unsalted butter (14g), melted — This binds the dry ingredients together. You could swap in coconut oil if needed.
- 1 tbsp honey (21g) — Adds sweetness and helps the crust hold its shape when pressed.
For the Filling
- 8 oz (226g) full-fat cream cheese, softened — Room temperature is non-negotiable here. Cold cream cheese creates lumps that never fully smooth out.
- 3/4 cup (170g) plain non-fat Greek yogurt — Thick and tangy, this adds creaminess and a solid boost of protein without extra fat.
- 1 cup (240g) low-fat cottage cheese — This is the secret to the fluffy, light texture. Pureed, it disappears completely.
- 1/2 cup (120g) liquid egg whites — These help the cheesecake set while keeping the filling light. Four large egg whites work too.
- 1/3 cup (80g) honey — Your main sweetener. It adds a floral note that enhances the vanilla.
- 1 tbsp cornstarch (8g) — A stabilizer that prevents cracking and helps the filling set cleanly.
- 1 tsp vanilla extract — Pure vanilla makes a difference here. Skip the imitation stuff.
- 1/8 tsp fine sea salt — A tiny pinch balances the sweetness and rounds out the dairy flavor.
Optional Garnish
- Fresh berries and a drizzle of honey — Not required, but the tartness of raspberries or blueberries cuts through the richness perfectly.
Equipment Needed
Before you start, make sure you have these tools on hand. Most of them are probably already in your kitchen.
- 6-inch springform pan — This is essential for clean release. The small size means taller slices, which makes portioning into 4 servings much easier.
- Food processor or blender — You need this for two jobs: grinding the oats and pureeing the filling until silky smooth.
- Electric mixer — Optional if you have a food processor, but useful if you want to use the stand mixer method instead.
- Parchment paper and aluminum foil — The parchment keeps the cheesecake from sticking, and heavy-duty foil creates the water barrier.
- Large roasting pan or baking dish — This holds your water bath. It needs to be big enough to fit the springform pan with room around it.
Instructions to Make Protein Cheesecake With Greek Yogurt Cream Cheese
Making this cheesecake takes a few steps, but each one is straightforward. Follow the order below and you’ll get clean, crack-free slices every time.
Step 1: Preheat and Set Up the Water Bath
Set your oven to 325°F / 163°C. Place a large baking dish on the lower rack and fill it halfway with hot water — this creates the steam that keeps your cheesecake from cracking.
While the oven heats, line your springform pan. Cut a parchment circle for the bottom and grease the sides well with butter. Wrap the outside tightly with two layers of heavy-duty foil.
Step 2: Make and Bake the Crust
In a small bowl, combine the almond flour, ground oats, and cinnamon. Stir in the melted butter and honey until the mixture looks like damp sand. It should hold together when you press it between your fingers.
Press the mixture into the prepared pan firmly — use the flat bottom of a glass for an even, compact layer. Bake for 8-10 minutes until fragrant and lightly golden around the edges. Cool completely on a wire rack.
Step 3: Puree the Filling
This is where the magic happens. Combine all filling ingredients in a food processor and puree for about 2 minutes until completely smooth. Stop once to scrape down the sides.
The mixture should be silky and pourable. If you’re using an electric mixer instead, beat the cream cheese first until fluffy, then add the other ingredients except egg whites. Fold in the egg whites gently at the end — overmixing after this stage introduces air that causes cracks.
Step 4: Assemble and Bake
Pour the filling over the cooled crust. Tap the pan on the counter 4-5 times to release any trapped air bubbles. The surface should be perfectly level.
Place the wrapped pan into a larger roasting pan and pour hot water halfway up the sides. Bake at 325°F / 163°C for 50-60 minutes. The edges should be set while a 2-inch area in the center still jiggles like soft custard. The internal temperature should hit 150°F / 66°C.
Step 5: Cool Gradually — This Is Critical
Turn off the oven and crack the door open 2-3 inches. Let the cheesecake cool inside for a full hour. This slow cooling prevents the top from sinking and cracks from forming.
Remove from the water bath, unwrap the foil, and cool to room temperature on a wire rack. Then refrigerate for at least 4 hours — overnight is better. Chilling is what gives you those clean, sharp slices.
Step 6: Release and Slice
Run a thin knife around the inside edge before unclipping the pan. If you used a parchment sling, lift the cheesecake off the bottom carefully. Let it sit for 10 minutes at room temperature, then slice into 4 equal pieces with a sharp knife.

What Went Wrong and How I Fixed It
I’ve had my fair share of baking mishaps with cheesecake over the years. Here are the most common problems and exactly how I solved them.
- Cracked top — I skipped the water bath once and paid for it. That gentle steam is what keeps the surface smooth, so don’t try to shortcut it.
- Lumpy filling — Cold cream cheese refuses to blend smoothly. Let every dairy ingredient come to room temperature before pureeing.
- Soggy crust — This happened when I skipped pre-baking the crust. That 8-10 minute bake sets the structure so it stays crisp.
- Water leaking into the pan — One layer of foil wasn’t enough. Use two layers of heavy-duty foil and make sure the seams are well covered.
- Sunken center — I opened the oven door too early to peek. Resist the urge — sudden temperature changes make the top collapse.
- Egg white streaks — Overmixing after adding egg whites creates air pockets and visible streaks. Fold them in gently just until combined.
What Do I Serve With Protein Cheesecake With Greek Yogurt Cream Cheese?
A slice of this cheesecake holds up beautifully on its own, but the right pairing can really make it sing.
- Fresh macerated berries — Toss strawberries or raspberries with a splash of lemon juice and let them sit for 10 minutes. The tart juice cuts through the rich cheesecake.
- Whipped coconut cream — A dairy-free topping that adds lightness without overwhelming the honey-vanilla flavor.
- Honey drizzle with flaky sea salt — The salt crystals brighten every bite and make the honey taste even sweeter.
- Espresso or black coffee — The bitterness of coffee balances the creamy sweetness. It’s an easy way to make this feel like a café dessert.
- Hot chamomile tea — Herbal tea brings out the honey notes. It’s a calming combo for an evening treat.
- Dark chocolate shavings — A light dusting of 70% dark chocolate adds depth without pushing the sugar too high.
Pro Tips to Make Perfect Protein Cheesecake With Greek Yogurt Cream Cheese
These are the small details that separate a good cheesecake from a great one. I learned most of them through trial and error.
- Room temperature everything — Pull the cream cheese, yogurt, and cottage cheese out of the fridge 30-45 minutes before starting. Cold dairy creates lumps that no amount of blending will fix.
- Scrape down the processor twice — After pureeing for a minute, stop and scrape the sides. Cottage cheese can hide in the corners, leaving chunks behind.
- Don’t skip the cornstarch — This small amount stabilizes the filling and helps it set without cracking during the cooling phase.
- Use a digital thermometer — The jiggle test is helpful, but hitting 150°F / 66°C internally tells you exactly when it’s done. No more guesswork.
- Tent with foil if browning fast — If the top colors too quickly during baking, lay a piece of foil loosely over the pan without sealing the edges.
- Let it age overnight — Cheesecake tastes better after a full night in the fridge. The flavors meld and the texture firms up for cleaner slicing.
- Sift protein powder if you add it — To boost protein further, stir one scoop of vanilla protein powder into the dry ingredients. Sift it first to avoid chalky lumps.
Variations of Protein Cheesecake With Greek Yogurt Cream Cheese
Once you’ve mastered the base recipe, try these twists to keep things interesting.
- Chocolate protein version — Add 2 tablespoons of unsweetened cocoa powder with the cornstarch and swap the vanilla for chocolate extract. It gives a mocha-like depth.
- Lemon honey cheesecake — Fold in 1 tablespoon of lemon zest and 2 tablespoons of fresh lemon juice with the filling ingredients. You get a bright, summery finish that complements the honey.
- Peanut butter swirl — Spoon 2 tablespoons of natural peanut butter over the filling and swirl it with a knife before baking. The nutty flavor pairs brilliantly with the oat crust.
- Higher-protein boost — Stir 1 scoop (about 30g) of vanilla or plain protein powder into the dry ingredients. Sift it first and it won’t change the texture at all.
- The no-oat, low-carb crust — Replace the rolled oats with 1 additional tablespoon of almond flour. You’ll get a slightly crumblier but fully low-carb crust.
- Berry compote topping — Simmer 1 cup of frozen berries with a spoonful of honey for 5 minutes until thickened. Spoon over each slice right before serving.
How Do I Store Protein Cheesecake With Greek Yogurt Cream Cheese Leftovers?
This cheesecake keeps remarkably well. Here’s how to store it properly so every slice tastes as good as the first.
- Airtight container — Store leftover slices in a sealed container in the refrigerator for up to 4 days. If you stack slices, place parchment paper between them.
- Wrap each slice individually — For freezing, wrap in plastic wrap first, then a layer of foil. This double barrier prevents freezer burn and keeps the texture creamy.
- Freeze for up to 2 months — Remove berries before freezing. You can portion slices directly from frozen — they’ll stay usable for 8 weeks.
- Thaw in the refrigerator — Transfer frozen slices to the fridge overnight. Rapid thawing at room temperature can cause condensation that makes the crust soggy.
- Serve cold or slightly room temp — This cheesecake is best enjoyed chilled. Let it sit out for no more than 10 minutes before eating.
How Do I Reheat Protein Cheesecake With Greek Yogurt Cream Cheese Leftovers?
Here’s the thing — reheating this cheesecake isn’t recommended, and the notes in the recipe say the same. But if you prefer it warm, here are your options.
- Microwave method — Heat one slice on 30% power for 15-second intervals. Stop as soon as it just takes the chill off — longer will melt the filling.
- Oven method — Warm at 300°F / 150°C for 5 minutes maximum. Watch it carefully; the cream cheese will soften quickly and lose its structure.
- Room temperature method — Honestly, this is my favorite approach. Let the slice sit out for 15-20 minutes. It softens slightly without risking any textural damage.
FAQs
Can I freeze Protein Cheesecake With Greek Yogurt Cream Cheese?
Yes, you absolutely can. Wrap each slice without berries snugly in plastic wrap and then foil — freeze for up to 2 months. Thaw overnight in the refrigerator and it’ll taste just as creamy.
How long does Protein Cheesecake With Greek Yogurt Cream Cheese last in the fridge?
Kept in an airtight container, leftover slices stay fresh for up to 4 days. The texture remains smooth and rich throughout that window.
Why did my cheesecake crack on top?
Cracks happen when the cheesecake cools too quickly or when excess air is whipped into the filling. That’s why the water bath and the gradual oven cooling are so important. The jiggle test also matters — pulling it out too early or too late changes how it settles.
Do I really need a water bath?
Yes. That steam keeps the oven moist and the temperature even, which is what prevents cracks. Skipping it is the number one reason cheesecakes split.
Can I use fat-free cream cheese instead?
You can, but I wouldn’t recommend it. Full-fat cream cheese is what gives the filling its luxurious mouthfeel. Lower-fat versions tend to make the texture slightly gummy.
What makes the texture so smooth?
The cottage cheese and Greek yogurt get fully pureed in a food processor until completely silky. That blend, along with the cornstarch, is what creates that velvety texture without any graininess.
Try These Recipes
Final Words
This Protein Cheesecake With Greek Yogurt Cream Cheese solved the problem I’d had for years — wanting a dessert that actually fits into my nutrition plan without tasting like a compromise. It’s rich, it’s smooth, and it genuinely satisfies that cheesecake craving with 27g of protein per serving.
Give it a shot this weekend. Your future self, digging into a cold slice on a busy Tuesday, will thank you.
PrintProtein Cheesecake With Greek Yogurt Cream Cheese
A rich, creamy cheesecake that packs over 25 grams of protein per slice, thanks to a combination of cream cheese and thick Greek yogurt. The light honey-vanilla flavor and smooth, velvety texture make it taste like a classic indulgent dessert, while the almond-oat crust adds a subtle nutty crunch.
- Prep Time: 20
- Cook Time: 55
- Total Time: 340
- Yield: 4
- Category: Dessert
- Method: Baking
- Cuisine: American
Ingredients
- Crust: 1/2 cup almond flour (56g)
- Crust: 2 tbsp rolled oats (12g), finely ground
- Crust: 1/4 tsp ground cinnamon
- Crust: 1 tbsp unsalted butter (14g), melted
- Crust: 1 tbsp honey (21g)
- Filling: 8 oz (226g) full-fat cream cheese, softened to room temperature
- Filling: 3/4 cup (170g) plain non-fat Greek yogurt, at room temperature
- Filling: 1 cup (240g) low-fat cottage cheese, at room temperature
- Filling: 1/2 cup (120g) liquid egg whites (or 4 large egg whites), at room temperature
- Filling: 1/3 cup (80g) honey
- Filling: 1 tbsp cornstarch (8g)
- Filling: 1 tsp vanilla extract
- Filling: 1/8 tsp fine sea salt
- Optional garnish: fresh berries and a drizzle of honey
- Special equipment: 6-inch springform pan, food processor (for crust), electric mixer (hand or stand), parchment paper, aluminum foil
Instructions
- Preheat your oven to 325°F / 163°C. Place a large baking dish (at least 9×13 inches) on the lower oven rack and fill it halfway with hot water — this creates a moist water bath that will prevent the cheesecake from cracking.
- Prepare the springform pan: cut a parchment paper circle for the bottom and line the sides with parchment strips or just omit the strips and grease very well with butter. Wrap the outside of the pan tightly with two layers of heavy-duty aluminum foil, covering the bottom and seams to prevent water from seeping in.
- For the crust, combine almond flour, finely ground oats, and cinnamon in a small bowl. Stir in melted butter and honey until the mixture looks like damp sand — it should clump when pressed between your fingers.
- Press the crust mixture firmly into the bottom of the prepared pan using your fingertips or the flat bottom of a glass. Ensure it is even and compact. Bake the crust for 8-10 minutes until it is fragrant and lightly golden around the edges. Remove to a wire rack to cool completely, leaving the oven on.
- While the crust cools, make the filling. In a food processor or blender, combine the softened cream cheese, Greek yogurt, cottage cheese, liquid egg whites, honey, cornstarch, vanilla, and salt. Puree until completely smooth — about 2 minutes. Stop once and scrape down the sides. The mixture will be silky and pourable.
- If you are using an electric mixer instead of a food processor, beat the cream cheese first until fluffy, then add the remaining ingredients except the egg whites. Once smooth, gently fold in the egg whites with a spatula. Whatever method you choose, do not over-mix after adding the egg whites, as excess air creates cracks.
- Pour the filling over the cooled crust. Gently tap the pan on the counter 4-5 times to release any air bubbles. The cheesecake should be perfectly level.
- Place the foil-wrapped pan into a larger roasting pan. Carefully pour the hot water from step 1 into the roasting pan until it reaches about halfway up the sides of the springform pan — this is the water bath.
- Bake at 325°F / 163°C for 50-60 minutes, or until the edges are set and a 2-inch round area in the center still jiggles like softly set custard. The internal temperature should read 150°F / 66°C. If the top is browning too fast, tent with foil.
- Turn the oven off and crack the oven door open 2-3 inches. Allow the cheesecake to cool in the oven for 1 hour. This gradual cooling prevents cracks and the top from sinking.
- Remove the cheesecake from the water bath, unwrap the foil, and place it on a wire rack. Cool to room temperature for about 1 hour, then cover and refrigerate for at least 4 hours (or ideally overnight) until chilled completely. This is essential for clean slices.
- To release the cake, run a thin knife around the inside edge of the pan, then unclip and lift the sides. Carefully lift the cheesecake off the bottom using the parchment sling you left at the sides. Let it sit at room temperature for 10 minutes before slicing.
- Use a sharp, clean knife to slice into 4 equal pieces, wiping the knife clean between cuts for neat edges. Serve with fresh berries and a drizzle of honey if desired.
- Store any leftovers in an airtight container in the refrigerator. The cheesecake is best enjoyed chilled.
Notes
Storage: Keep in the refrigerator in an airtight container for up to 4 days. To freeze, wrap each slice (without berries) snugly in plastic wrap and then foil — freeze for up to 2 months. Thaw in the refrigerator overnight. The texture remains creamy and rich after thawing. For best results, enjoy cold or at room temperature within 10 minutes. Reheating is not recommended, as it will melt the cheesecake. To boost protein even higher, you can stir in 1 scoop (about 30g) of vanilla or plain protein powder with the dry ingredients — be sure to sift it to avoid lumps.
Nutrition
- Calories: 315
- Sugar: 17g
- Sodium: 425mg
- Saturated Fat: 10g
- Carbohydrates: 20g
- Fiber: 2g
- Protein: 27g
- Cholesterol: 72mg
Keywords: protein cheesecake, high protein dessert, Greek yogurt cheesecake, low sugar cheesecake, no bake cheesecake, baked cheesecake, healthy cheesecake, high protein baking, cheesecake recipe, protein dessert, dessert for muscle building, post-workout dessert